![]()
Beautiful Plants For Your Interior
![]()
Beautiful Plants For Your Interior
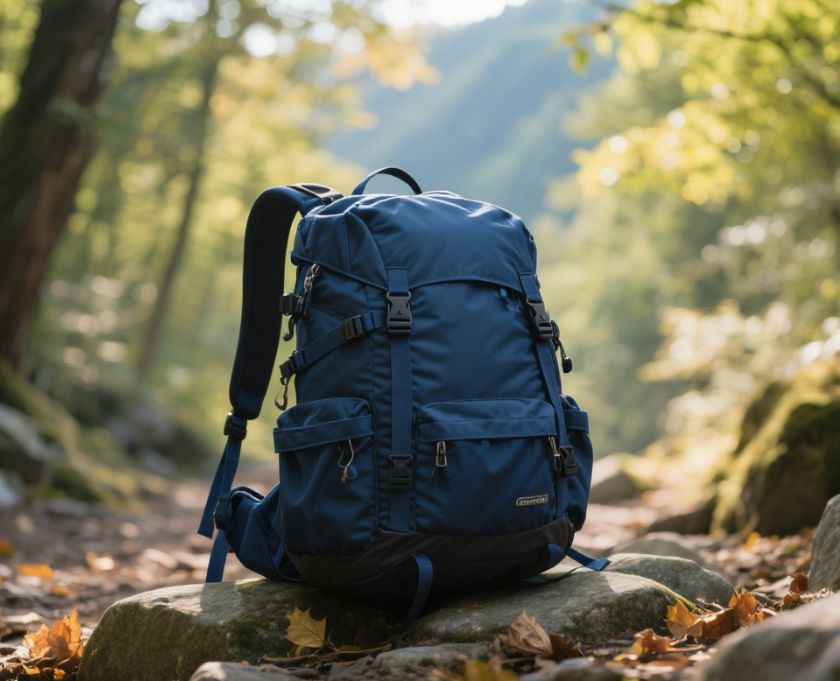
Have you ever started a hike excited and confident, only to find your shoulders aching and your waist sore an hour in? Maybe your sunscreen is buried at the bottom of your pack, and your jacket is crumpled beneath your tent. Sound familiar?
The issue might not be your strength or stamina—it’s likely your backpack.
For any hike lasting longer than a few hours, especially if you’re carrying gear for an overnight or multi-day adventure, your backpack is not just a bag. It’s your trail partner, mobile gear closet, and even safety net.
Choosing the right backpack will determine not only how far you go, but how comfortably you get there. In this guide, you’ll learn how to select the best backpack for hiking, covering:
Backpack size is measured in liters (L). What you carry—and how long you’ll be hiking—should dictate the volume. Here’s a general rule of thumb:
| Trip Duration | Suggested Capacity | What It Holds |
|---|---|---|
| Day Hike | 15–25L | Water, snacks, sunblock, windbreaker |
| 2–3 Days Trek | 30–50L | Sleeping bag, cookware, clothing, food |
| 4+ Days Trek | 50–75L+ | Extended gear, shelter, food supplies |
Too small, and you’ll be strapping everything to the outside. Too large, and you’ll end up carrying unnecessary weight, wasting energy with every step.
If you’re hiking for three days in mild weather with occasional resupply stops, a 40–50L backpack is likely sufficient. But for isolated alpine trekking with no support, 60L or more might be essential.
Why Your Pack’s Fit Is Just as Important as Its Capacity
If capacity determines what you can carry, your backpack’s suspension system determines how comfortably you carry it.
The suspension system includes all the structural and adjustable parts that make the backpack sit properly on your body. When it’s working well, the pack’s weight feels like an extension of your body. When it’s poorly designed—or poorly fitted—you’ll feel every ounce, every mile.
Let’s break down exactly what makes up a good suspension system, how it should feel, and how to test it before you commit.
You might assume shoulder pain or a stiff back is inevitable on long hikes. It’s not. A well-designed backpack distributes 60–80% of the load onto your hips, minimizing shoulder strain and allowing for greater endurance and better posture.
Common symptoms of poor suspension include:
The right suspension can eliminate all of the above—even with a full load.
Shoulder straps help stabilize the load and balance it left to right—but should carry as little weight as possible.
Key features:
The hip belt should do the heavy lifting—literally.
It should wrap comfortably around your hip bones (not your waist), and distribute weight downward through your skeletal system rather than your soft tissue.
What to look for:
If your hip belt isn’t snug and secure, you’re robbing your legs of their power.
The sternum strap helps prevent the shoulder straps from drifting outward, which reduces lateral strain and improves stability—especially on technical terrain or steep climbs.
Some models offer elasticized or sliding sternum straps for better comfort and fit.
These components keep the pack stable and allow air to circulate between your back and the bag.
Frame types:
Back panel styles:
Even the best suspension system won’t help if it’s not properly adjusted. Here’s how to check if a pack fits:
A properly fitted backpack should hug your body securely without pressure points. You should be able to walk, bend, and twist without the bag shifting.
Think of your suspension system as your trail suspension—it cushions every step, stabilizes your posture, and protects your joints. Even if your pack looks great and has all the right features, if it doesn’t fit your body, you’ll end up regretting it after a few hours on the trail.
So try before you buy. Adjust everything. Walk around. Jump, squat, and shift your weight. Your backpack shouldn’t just carry gear—it should carry it like it was made for you.
No More Backpack Excavations—Smart Layouts Save Time and Energy
Picture this: you’re halfway up a trail, the sun is blazing, and you desperately need sunscreen. You unzip your pack… and realize it’s buried under your sleeping bag, your stove, and your hoodie. You pull everything out, apply the sunscreen, and then repack it all—losing precious time and patience.
That’s why intelligent compartment design is a game changer.
In this section, we’ll break down how well-designed pockets and access points can make your hiking experience significantly smoother, especially during multi-day treks or changing weather conditions.
A backpack isn’t just a giant sack to dump things into—it’s a system. When that system is optimized, it helps you:
In short: a smart organization saves energy, time, and sanity.
Let’s go over the essential zones your hiking backpack should offer:
This is where your bulkier gear goes—sleeping bag, clothes, tent parts, cookware.
➡️ Pro Tip: Use compression sacks and packing cubes to group gear by function (e.g., sleep system, clothing, cooking gear).
The lid (or “brain”) is usually detachable or floating.
Ideal for:
The idea is: items you’ll need fast and often go here.
A large external pocket, usually with elastic or zippered access.
Good for:
This keeps moist items away from your clean, dry gear inside.
Usually made of mesh and ideal for:
➡️ Use with caution: tall items here can snag on brush.
These are incredibly underrated.
Use them for:
You can access these without removing your pack—perfect for on-the-go convenience.
Almost all modern hiking backpacks have an internal sleeve for a hydration bladder and a hole for routing the hose.
➡️ Make sure your bladder size matches your sleeve capacity—usually 2–3 liters.
Some backpacks have a dedicated bottom compartment, often designed for a sleeping bag or dirty laundry.
Useful for:
Think of your backpack as a building:
This approach aligns your center of gravity properly and improves comfort.
Remember: every time you stop to unpack and repack, you’re wasting trail time and burning energy.
Modern backpacks now offer organizational upgrades like:
While not essential, these can add serious convenience—especially on technical treks.
Good compartment design isn’t just a “nice to have”—it’s a key part of making your hike safer and more efficient. Whether you’re caught in sudden rain, navigating dense woods, or hustling to set up camp before dark, being able to find your gear fast gives you an edge.
So, don’t just look at how much a backpack holds. Look at how it holds it.
Because Your Gear Should Survive More Than Just One Adventure
A hiking backpack is more than a container—it’s your portable shelter, pantry, wardrobe, and gear locker. It will be scraped on rocks, splashed by rain, shoved under bus seats, and dropped in the dirt. That means one thing: your backpack’s materials must be up to the task.
In this section, we’ll break down everything you need to know about backpack fabric types, waterproofing, frame strength, and the construction details that determine whether your pack will last one season—or ten.
When you’re hiking across muddy trails, climbing ridgelines, or setting up camp in the rain, your backpack faces it all with you. Durability affects not just longevity, but comfort, performance, and even safety.
A torn strap, soaked gear, or failed zipper in the backcountry can turn a challenging hike into a real emergency.
The right materials will:
Let’s explore what those materials are and what you should look for.
The most common material in modern hiking backpacks.
✅ Pros:
❌ Cons:
➡️ Best for: All-around trail use and ultralight gear
Heavy-duty nylon is known for its incredible durability.
✅ Pros:
❌ Cons:
➡️ Best for: Rugged expeditions and thru-hikes
Used in some budget hiking backpacks.
✅ Pros:
❌ Cons:
➡️ Best for: Occasional hikers or light-duty use
Rare today, but still seen in heritage-style packs.
✅ Pros:
❌ Cons:
➡️ Best for: Casual day hikes or vintage-style gear lovers
Very few hiking backpacks are truly “waterproof.” Instead, most are water-resistant, which means they can handle light rain or splashes, but not a torrential downpour.
✅ Pro Tip: Always pack key gear in dry bags or use a trash compactor liner as a DIY pack liner inside your main compartment.
A great backpack is only as strong as its weakest zipper.
Even fabric built like armor won’t help if your internal frame fails.
Look for:
A good frame gives structure, directs weight to your hips, and keeps the load stable.
Avoid backpacks that:
If a brand hides its materials behind vague marketing terms like “tough shell” or “heavy-duty fabric,” be skeptical. Always check specs.
Your hiking backpack should be an investment, not a gamble. Whether you’re heading out on a weekend loop or a thru-hike across mountain ranges, your pack’s material quality will determine how well it supports you—literally.
So when choosing your backpack, don’t just focus on looks or weight. Take a few extra minutes to investigate what it’s made of—because durability, weather resistance, and frame integrity are what count when you’re 20 kilometers from the nearest trailhead.
Because Comfort Shouldn’t Be One-Size-Fits-All
When it comes to hiking backpacks, the term “adjustability” isn’t a marketing gimmick—it’s the secret ingredient to comfort and performance. A backpack may have the perfect capacity and durable materials, but if it doesn’t adjust to your body, you’re going to feel every bump, shift, and strain for miles.
In this section, we’ll explore the adjustable features that matter most, how to use them correctly, and how to fine-tune your pack to make it feel like a natural extension of your body.
No two hikers are built the same. Height, torso length, shoulder width, hip size—even gender—affect how a pack fits.
Adjustable systems ensure:
Most importantly, the ability to tweak your pack while you hike can mean the difference between a “tolerable” day and a truly enjoyable adventure.
This is the most critical adjustment for proper fit.
Your torso length is measured from your C7 vertebra (the bony bump at the base of your neck) to your iliac crest (top of your hip bones).
🧭 Pro Tip: Try adjusting while the backpack is partially loaded. It helps simulate a real trail experience.
Shoulder straps should:
Look for:
Your hip belt is where most of the weight should rest.
Key features:
The belt should sit on your hip bones, not above or below them. A loose or high belt causes pressure to shift back to your shoulders.
This small horizontal strap keeps your shoulder straps from sliding outward.
Look for:
The sternum strap should rest approximately one inch below your collarbone—not too high, and not across your throat.
Not just for aesthetics! Compression straps help:
They should be fully adjustable, ideally with buckles rather than fixed velcro or loops.
Follow these steps to adjust your backpack perfectly:
Walk around. Bend forward. Twist. If the pack moves with you, you’ve nailed it.
Some packs are specially designed for different body types:
Even if you fall between sizing charts, adjustable systems can bridge the gap.
🧭 Pro Tip: Try gender-specific models regardless of marketing—they’re based on fit, not function.
You wouldn’t hike in boots that don’t fit—don’t carry a backpack that doesn’t either.
Think of your backpack as a wearable tool. It should feel like it was made for you, not like something you have to tolerate. The more adjustable your backpack is, the more comfortable, balanced, and capable you’ll feel on the trail.
A great backpack should disappear when worn correctly—you’ll forget it’s there. That only happens when every part fits just right.
Because Choosing the Wrong Pack Can Ruin the Right Trail
You’ve read about size, fit, materials, and features. But before you click “add to cart” or walk out of that gear store, let’s pause.
Even experienced hikers fall into a few common traps when buying a backpack—mistakes that can cost you comfort, money, and enjoyment on the trail.
In this final section, we’ll cover the most frequent backpacking errors and show you how to avoid them.
We get it—more space feels like more flexibility. But an oversized pack leads to:
On the flip side, too-small packs cause:
🧠 Avoid It: Choose capacity based on your most common trip length + gear volume. If in doubt, try the next size down first.
Too many hikers buy based on height—but torso length is what truly matters. A mismatch means:
🧠 Avoid It: Measure your torso. Try the pack on with weight. Make sure the hip belt sits snugly on the iliac crest—the top of your hip bones.
You watched five YouTube videos. Everyone says “This is the ultimate backpack.” It looks sleek. It’s on sale. You buy it.
Then it pinches your shoulders, lacks side pockets, and isn’t water-resistant.
🧠 Avoid It: Let your body type, gear load, and trail style guide you—not reviews. A perfect pack for a 5’2″ ultralight hiker may fail a 6’1″ alpine climber.
Some packs are overbuilt. All those features, frames, and compartments add weight before you even load gear.
🧠 Avoid It: Balance durability with the intended use. For thru-hikes, aim for a base pack weight under 3 lbs unless you’re carrying heavy gear.
Hot spots. Back sweat. Moisture seeping through. The wrong back panel can be miserable on long hikes.
And a backpack without a rain cover or DWR coating? Disaster in a storm.
🧠 Avoid It: Look for:
Don’t rely solely on looks—performance matters more than polish.
Too many people try on an pack empty. Then discover on the trail that their perfect store fit becomes a backbreaker when loaded.
🧠 Avoid It: Load the pack with 15–20 lbs (6–9 kg) and walk around the store—or your house. Go up stairs. Bend down. Jump.
It should feel secure and balanced without sagging or shifting.
A 65L alpine expedition pack isn’t ideal for urban travel. A frameless 25L daypack won’t support a multi-day winter trek.
🧠 Avoid It: Match the pack to the trip, not just your wishlist. In time, many hikers build a “quiver” of packs for different adventures:
Yes, that ultra-lightweight pack has 18 exterior straps, daisy chains, a crampon hook, and a built-in whistle… but if it digs into your back or lacks real support, none of it matters.
🧠 Avoid It: Prioritize fit and function first, then look at accessories. You can always add a whistle or bungee cord—but you can’t redesign the frame.
Online shopping is convenient, but for something as personal as a backpack, there’s no substitute for a real-world test.
Whenever possible:
Your future self on mile 10 (or 100) will thank you.
Choosing the right hiking backpack isn’t about chasing trends or copying influencers. It’s about finding the right tool for your adventure, your body, and your gear.
The perfect pack:
✅ Fits your torso and hips like a glove
✅ Has the right volume for your trip duration
✅ Keeps gear organized and dry
✅ Feels stable and light even when loaded
✅ Adapts to your needs, not the other way around
Once you find that pack? Every mile feels smoother. Every ascent feels lighter. And the trail becomes what it should be: a joy, not a burden.